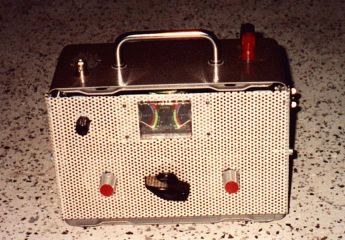
A QRP Transmatch ATU
Introduction
In regard of my contemporary personal situation, I decided to do something reasonable to come to new thoughts... Despite the title, this following device is not for qrp use only, as my experience soon proved. It was possible to match a 2m vertical wire at 80m with no sparks occuring up to 50W RF. But... on air experiences will show up later...Circuit diagram
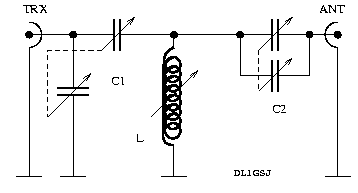
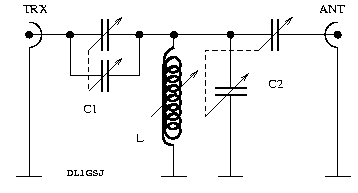
First approach, the ultimate transmatchNext try, the SPC transmatch
Circuit description
For theoretical background I would like to point the reader to the common standart literature as the famous RF textbook of Meincke and Gundlach, or comparable other readings. The first approach was thought as an experiment to understand the so called ultimate transmatch (UT, first proposed by Lew McCoy). In principle I would recommend this design, also driven by my practical experience. It delivers good matching with moderate bandwidths. Besides that this design might have a slightly higher loss.Apart from what I have written in the first version of this text, all the parts were fine to build a UT-ATU, but the rotary switch, and my attention at this time, fooled me. Thinking I got a 1x12 switch, I soldered the wires fitting this type. A few days later, reading a catalogue, it was clear, that the built in think is a 2x6 type. An additional switch cured the "problem". So, the finally completed ATU now is an UT.
Advantages: very smooth tuning even at the more critical frequencies like 29.690MHz, our local (Hamburg, Germany) repeater. QRO in this design seems not to be harmful at all, 120W RF on all available bands (40m to 10m) were matched to a 2m wire as well as to a 10m wire w/o sparkling ATU ;-)
As a comparison, I chose the series-parallel capacitance transmatch (SPC), for the reason that it took me just two leads reconfigured to convert on to another. Formerly I also planned to test the standart transmatch, but the overwhelming wish to get on air forced me to stay at the simple - to - obtain - by - the - most - simple - modification - design (smiley!). Disadvantages in this design (agn, have a glance to the textbooks) are the extreme narrow bandwidths and the low QRO ability (high Q).
What to chose if money plays no role? Certainly I would go for the UT, with two two-gang vernier capacitors at 1nF max (in both sections) and a roller inductor... if... but... it's all built from the junk-box.
Parts descriptions
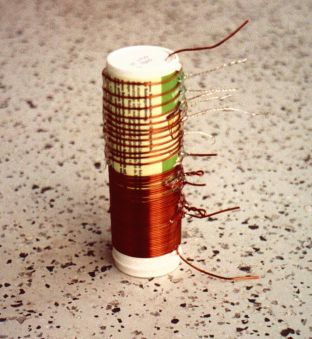
The capacitors are the simple part. I just found them on the bottom of my junk box. They look like they were intended to go into AM broadcast receivers. In either design one has both sections wired in parallel. The inductor, the tricky thing in matching units with variable inductance. For the body I found an old pill container with a diameter of 4cm. The coil is then wound on this with 60 windings of 1mm enameled copper wire. The first 36 windings tight together, the rest with increasing wire to wire distances to the upper (hot) end of the coil. Tabbings are located at the windings 19, 28, 37, 42, 47, 50, 53, 55, 57, 58 and 59 for use with a 12 positions rotary switch shortening to ground, as I thought... In reality it's a 2x6 with an additional switch.SWR indicator
My good friend Rico (DF2CK) had the heart to donate a PCB reflectometer to me. To make one yourself, have a look at Harry's (SM0VPO) Homebrew Page. Can't remember the way Harry did the rest, I added a 47k potentiometer for sensitivity adjustment, and a 4k7 suppression resistor to the forward meter, for reasonable reading during the tuning process. The meter itself is a standart stereo VU-meter, found in obsolete tape recorders (other superb parts could be found there likewise). Usage: Highest sensitivity and lowest reasonable RF power to start with. During the tuning you certainly will increase the RF power the closer you are to good matching. With CW, your favoured mode ;-), you then automaticaly will have the correct sensitivity setting during QSOs. For SSB contacts, you should keep in mind to reduce the sensitivity close to zero after tuning. The clicking meters will remember you to do so elsewise. Weak nerves would make you think of a sparkling capacitor, hi!Tuning procedure
Yes, I know, that's common knowledge... but... we have two designs in this report. My experience was that the both designs have a contrary behaviour. Tuning with the UT: Fiddle during RX with all the buttons to get the loudest noise. You're allready close! Next is done with a little RF applied, power depending on the band, little fine tuning, done! QSO! Tuning mainly was done during RX. On the other hand I experienced that the RX maximum must not be the minimum in SWR.Tuning with the SPC transmatch: More difficult, because of the narrow bandwidths. Set your transmitter to a few tens of milliwatts to find a C-L-C combination where the reflected power is halfways acceptable. Now the game begins! By slightly in/de-creasing certain capacities and inductivities find a good match. You will notice, it's much more complicated to find a good match, as the SPC transmatch with the given parts will provide exactly one for a specific aerial<->QRG combination.
Experiences
Clearly the SPC transmatch easily is able to match a 2m wire to 3.5Mhz w/o any problem, but, whatever band you're QRV on, watch the reflected power... Using the SPC transmatch, you will have to retune every tens of kHz. The UT give, as mentioned above, broader bandwidths. With both designs it now is possible to match a 2m wire to all bands (even 160m, although this makes no sense at all). It was easy to confirm the statements given in the literature about the behaviour of the presented matching networks. So, before you start soldering, think about what kind of aerial you want to match, and have a closer look to the textbooks. The opinion given there is that the UT can better handle inductive loads while the SPC transmatch is performing smoother on capacitive loads.Photographs
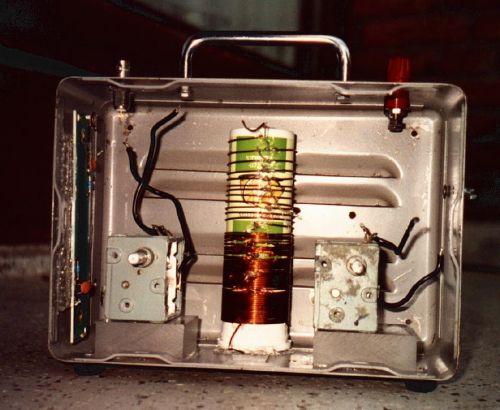
The inductor. I know, does not look extremely professional...Box, partially assembled. The capacitors are glued to PVC insulators (using hotglue). Also the pill container inductor is glued to the box. On the left side, you can see the reflectometer PCB.
Box, completed. The knobs for the capacitors nowadays are replaced by larger ones, depending on the settings your hand has a strong influence to the capacities.
